
Slimline s3230 Guide
User manual for Slimline s3230
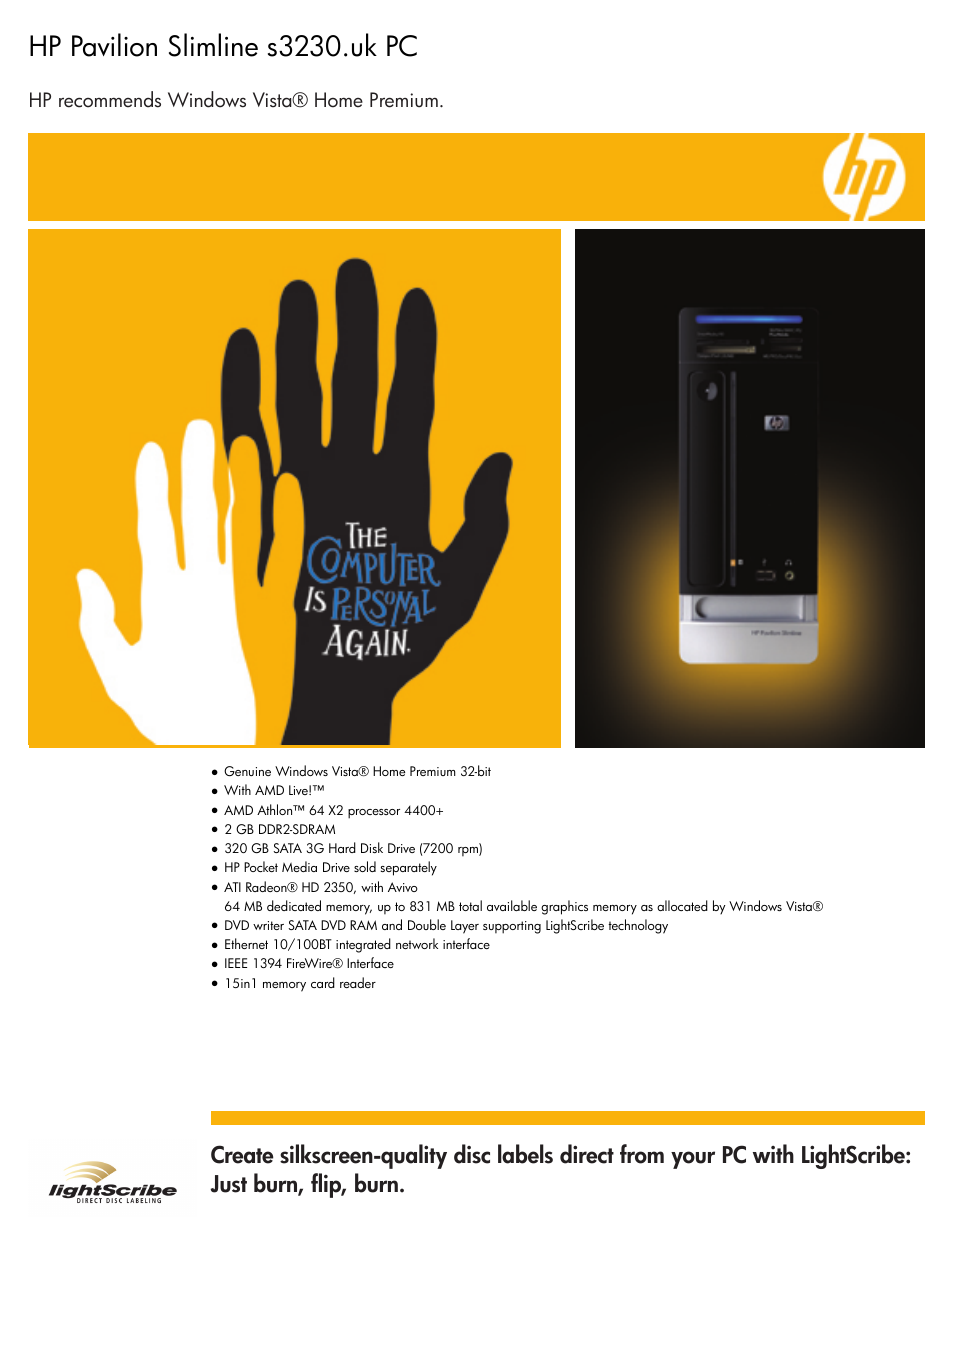
Table of contents
Document Outline
- en Table of Contents 3
- en Table of Contentsen Operating instructions
- Information concerning disposal 5
- Installing the appliance 5
- Ventilation 5
- Connecting the appliance 5
- Getting to know your appliance 7
- Switching the appliance on 10
- Set the language 10
- Setting the temperature unit 10
- Setting the temperature 10
- Special functions 11
- Alarm function 12
- Refrigerator compartment 12
- Super cooling 12
- “cool-fresh” drawer 13
- Freezer compartment 13
- Freezing and storing food 13
- Freezing fresh food 13
- Super freezing 14
- Thawing frozen food 14
- Ice maker 14
- Water filter 15
- Specification and performance data sheet for water filter cartridge 16
- Cleaning the appliance 17
- Odours 17
- Exchange the odour filter 17
- Light (LED) 18
- Tips for saving energy 18
- Operating noises 18
- Eliminating minor faults yourself 19
- Customer service 21
- Warranty 21
- Safety and warning information
- Definition
- Before you switch ON the appliance
- Technical safety
- Important information when using the appliance
- Children in the household
- General regulations
- Information concerning disposal
- Installing the appliance
- Ventilation
- Connecting the appliance
- Water connection
- Electrical connection
- , WARNING:
- , WARNING:
- , WARNING:
- , WARNING:
- Never connect the appliance to electronic energy saver plugs.
- Our appliances can be used with mains and sine-controlled inverters. Mains-controlled inverters are used for photovoltaic systems which are connected directly to the national grid. Sine-controlled inverters must be used for isolated applications (e.g...
- Getting to know your appliance
- These operating instructions refer to several models.
- The diagrams may differ.
- 2 door model
- 3 door model
- Controls
- Note:
- Symbols in the display field
- Switching the appliance on
- Set the language
- Setting the temperature unit
- Setting the temperature
- Special functions
- Alarm function
- Refrigerator compartment
- Super cooling
- “cool-fresh” drawer
- Freezer compartment
- Freezing and storing food
- Freezing fresh food
- Super freezing
- Thawing frozen food
- Ice maker
- Water filter
- , WARNING:
- , CAUTION:
- Note:
- Exchanging the filter cartridge
- 1. Turn the filter cap on the base of the appliance by 90–180° anti-clockwise.
- 2. Pull out the filter cartridge.
- 3. Take a new filter cartridge from the packet and remove the protective cap.
- 4. Take the filter cap off of the used filter cartridge.
- 5. Place the filter cap on the fresh filter cartridge.
- 6. With the filter cap in a horizontal position, feed the filter cartridge into the opening on the appliance base as far as it will go.
- 7. Turn the filter cartridge 90–180° in a clockwise direction.
- 8. Pour water out of the used filter cartridge. The filter cartridge can be disposed of in the household rubbish.
- Note:
- 1. Turn the filter cap on the base of the appliance by 90–180° anti-clockwise.
- Specification and performance data sheet for water filter cartridge
- Cleaning the appliance
- , WARNING:
- , CAUTION:
- Proceed as follows:
- 1. Before cleaning: Switch the appliance off.
- 2. Pull out the mains plug or switch off the fuse.
- 3. Take out the frozen food and store in a cool location. Place the ice pack (if enclosed) on the food.
- 4. Clean the appliance with a soft cloth, lukewarm water and a little pH neutral washing-up liquid. The rinsing water must not run into the light.
- 5. Wipe the door seal with clear water only and then wipe dry thoroughly.
- 6. After cleaning reconnect and switch the appliance back on.
- 7. Put the frozen food back in the freezer compartment.
- 1. Before cleaning: Switch the appliance off.
- Interior fittings
- Odours
- 1. Switch the appliance off.
- 2. Take all food out of the appliance.
- 3. Clean the interior. See chapter “Cleaning the appliance”.
- 4. Clean all packages.
- 5. Seal strong smelling food in order to avoid odours from forming.
- 6. Switch the appliance on again.
- 7. Store food in the appliance.
- 8. Check whether the formation of odours is still occuring after 24 hours.
- 9. Exchange the odour filter. See chapter “Exchange the odour filter”.
- 1. Switch the appliance off.
- Exchange the odour filter
- Light (LED)
- Tips for saving energy
- Operating noises
- Cleaning the appliance
- Eliminating minor faults yourself
- es Índicees Instrucciones de uso
- Consejos para la eliminación del embalaje y el desguace de los aparatos usados 25
- Instalación del aparato 25
- Ventilación 25
- Conectar el aparato a la red eléctrica 26
- Familiarizándose con la unidad 27
- Conectar el aparato 30
- Ajuste del idioma 30
- Ajustar la magnitud de la temperatura 30
- Ajustar la temperatura 30
- Funciones especiales 31
- Función «alarm» 32
- Compartimento frigorífico 32
- Superfrío 33
- Cajón para conservación fresca 33
- Compartimento de congelación 33
- Congelar y guardar alimentos 33
- Congelar alimentos frescos 34
- Supercongelación 35
- Descongelar los alimentos 35
- Fabricador de hielo 35
- Filtro de agua 36
- Hoja con las especificaciones y datos técnicos del filtro de cartucho del agua 37
- Limpieza del aparato 38
- Olores 38
- Sustituir el filtro desodorizante 39
- Iluminación interior (LED) 39
- Consejos prácticos para ahorrar energía eléctrica 39
- Ruidos de funcionamiento del aparato 39
- Pequeñas averías de fácil solución 40
- Servicio de Asistencia Técnica 42
- Garantía 43
- Consejos y advertencias de seguridad
- Definición
- Antes de emplear el aparato nuevo
- Seguridad técnica
- Al usar el aparato
- En caso de haber niños en el hogar
- Observaciones de carácter general
- Consejos para la eliminación del embalaje y el desguace de los aparatos usados
- * Consejos para la eliminación del embalaje de los aparatos
- * Desguace de los aparatos usados
- , AVISO:
- Antes de deshacerse de su aparato usado
- 1. Extraer el enchufe de conexión del aparato de la toma de corriente de la red eléctrica.
- 2. Corte el cable de conexión del aparato y retírelo conjuntamente con el enchufe.
- 3. No retirar los soportes y baldas del aparato a fin de no facilitar a los niños el acceso al interior de éste.
- 4. No permita que los niños jueguen con los aparatos inservibles. ¡Peligro de asfixia!
- Antes de deshacerse de su aparato usado
- , AVISO:
- Instalación del aparato
- Ventilación
- Conectar el aparato a la red eléctrica
- Conexión del aparato a la red de agua
- Conexión a la red eléctrica
- , AVISO:
- , AVISO:
- , AVISO:
- , AVISO:
- El aparato no se podrá conectar en ningún caso a conectores electrónicos para ahorro energético.
- Nuestros aparatos se pueden conectar a rectificadores de corriente por onda sinusoidal o conmutados por red. Los rectificadores conmutados por red se emplean en las instalaciones fotovoltaicas conectadas directamente a la red pública de abastecimien...
- Familiarizándose con la unidad
- Las presentes instrucciones de uso son válidas para varios modelos de aparato.
- Por ello es posible que las ilustraciones muestren detalles y características de equipamiento que no concuerdan con las de su aparato concreto.
- Modelo de 2 puertas
- Modelo de 3 puertas
- Elementos de mando
- Nota:
- Símbolos en la pantalla de visualización
- Conectar el aparato
- Ajuste del idioma
- 1. Pulsar la tecla «setup».
- 2. Pulsar las teclas selectoras ¾ ó ¿, hasta que aparezca el idioma programado.
- 3. Pulsar las teclas de ajuste @ ó A hasta que aparezca en la pantalla de visualización el idioma deseado.
- 4. Pulsar la tecla «setup» para memorizar los ajustes. En la pantalla de visualización se vuelve a mostrar la temperatura ajustada.
- 1. Pulsar la tecla «setup».
- Ajustar la magnitud de la temperatura
- Ajustar la temperatura
- Funciones especiales
- Modo «Configuración»
- Activar la función
- Efectuar los ajustes deseados
- 1. Activar el «Modo Configuración».
- Modo «Vacaciones»
- Modo «Sabbath»
- Modalidad de ahorro energético
- Activar la función
- 1. Pulsar la tecla «setup».
- 2. Pulsar la tecla selectora ¿ hasta que aparezcan en pantalla el modo ECO MODE y el ajuste actual (OFF).
- 3. Pulsar las teclas de ajuste @ para modificar los ajustes.
- 4. Pulsar la tecla «setup» para memorizar los ajustes.
- En la pantalla de visualización aparece la leyenda ECO.
- Desconexión y paro de la unidad
- 1. Pulsar la tecla «setup».
- Modo «Configuración»
- Función «alarm»
- Compartimento frigorífico
- Superfrío
- Cajón para conservación fresca
- Compartimento de congelación
- Congelar y guardar alimentos
Related manuals for Slimline s3230
New Manuals
- ZyXEL Communications ZyXEL G-162 Video Gaming Accessories User Manual
- ZyXEL Communications EW103U/A Video Gaming Accessories User Manual
- Western Telematic RSM-8 Video Gaming Accessories User Manual
- Western Telematic RSM-32DC Video Gaming Accessories User Manual
- Western Telematic RSM-32 Video Gaming Accessories User Manual
- Western Telematic RSM-16DC Video Gaming Accessories User Manual
- Western Telematic RSM-16 Video Gaming Accessories User Manual
- Viking Electronics FBI-1A Video Gaming Accessories User Manual
- Viking Electronics DVA-500A Video Gaming Accessories User Manual
- Viking Electronics DVA-3003 Video Gaming Accessories User Manual
- Viking Electronics DVA-2W Video Gaming Accessories User Manual
- Viking Electronics DVA- 1003B Video Gaming Accessories User Manual