
POCEYE-DW Guide
User manual for POCEYE-DW

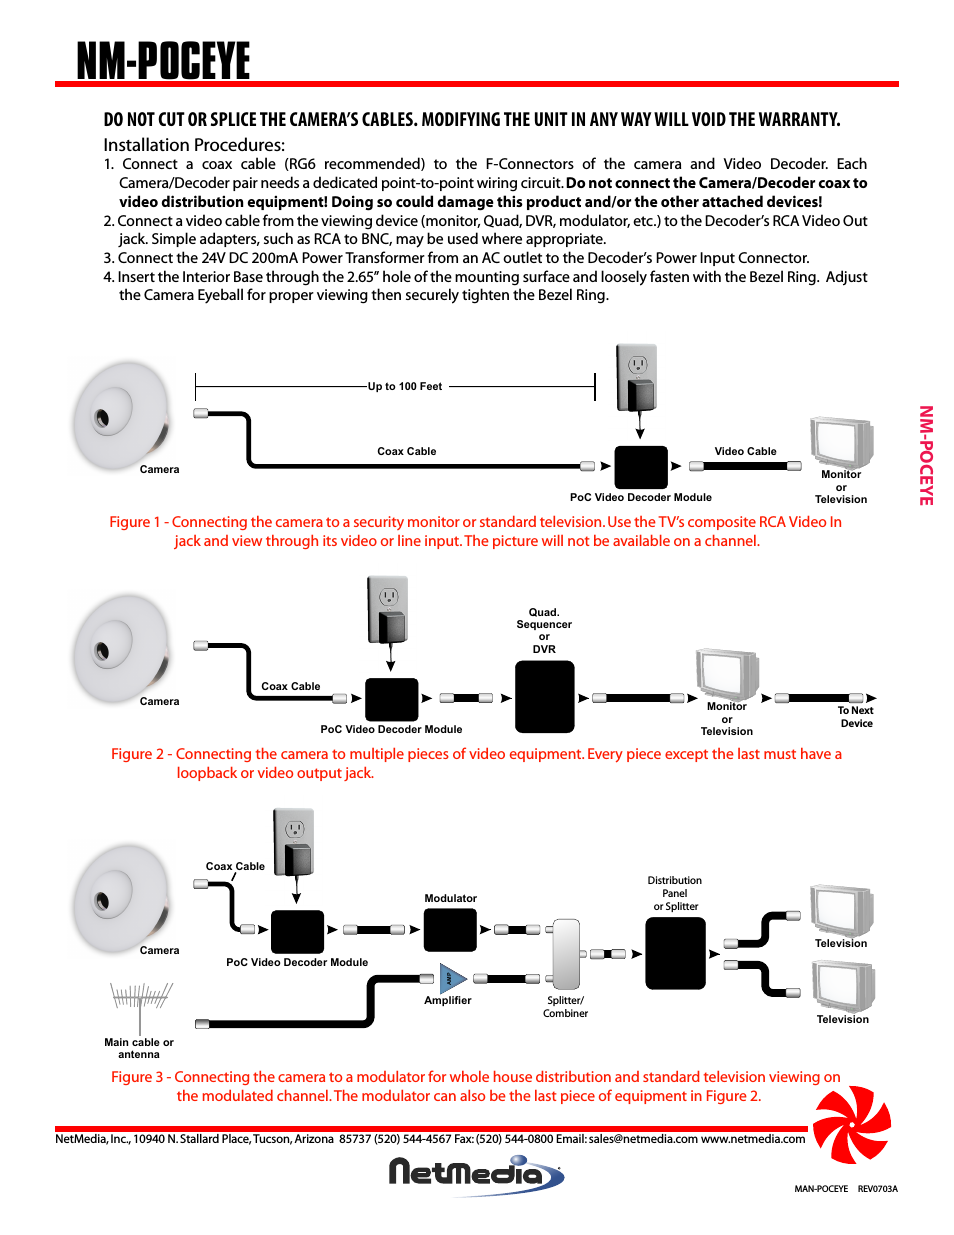
Table of contents
Document Outline
- Contents
- Preface
- System Overview
- The Maestro Configuration Editor
- The Maestro Configuration Editor
- Configuration Editor Guidelines
- 1st Step: Connections
- 2nd Step: Definition
- 3rd Step: Audio Sets
- 4th Step: Branding Engine
- 5th Step: Input/Output Sets
- 6th Step: Input-based Sets
- 7th Step: Effects Configuration
- 8th Step: Channel Sets
- 9th Step: General
- Configuration Editor Shortcut Icons
- Configuration Files
- Re-compiling a Prior Version Configuration File
- Basic Maestro Operation
- Powering Up the System
- GUI Control Panel Start Up
- System Buttons (GUI Only)
- Video Overlay Option (GUI Only)
- Program, Preset and AUX Buses
- Transition Setup
- Using the Take Button to Complete a Transition
- Selecting Transition Effects
- Selecting Configured Independent Transitions
- Audio/Video Breakaway
- Audio Controls
- Dynamic Channel Mapping
- Keyer Section
- Upstream Keyer Operation
- Downstream Keyer Operation
- Audio Mixer Operation
- Channel Control Selection
- Automation Disable
- Clock/Timer
- Save Assignment Set (Board Setup Save/Recall)
- Emergency Alert System Switching
- Adding a Panel Server Connection
- Channel Branding Overview
- Installation Planning
- Branding User Operations
- Visualization Tools
- DVE Option Configuration
- Maestro Content Management Center
- Emergency Alert System Messaging
- Pre Roll Take Feature
- Channel Branding Text Display Formatting
- Animation File Size
- Insertion of Keys and Audio Overs via GPI
- Specifications
- Index
Related manuals for POCEYE-DW
New Manuals
- ZyXEL Communications ZyXEL G-162 Video Gaming Accessories User Manual
- ZyXEL Communications EW103U/A Video Gaming Accessories User Manual
- Western Telematic RSM-8 Video Gaming Accessories User Manual
- Western Telematic RSM-32DC Video Gaming Accessories User Manual
- Western Telematic RSM-32 Video Gaming Accessories User Manual
- Western Telematic RSM-16DC Video Gaming Accessories User Manual
- Western Telematic RSM-16 Video Gaming Accessories User Manual
- Viking Electronics FBI-1A Video Gaming Accessories User Manual
- Viking Electronics DVA-500A Video Gaming Accessories User Manual
- Viking Electronics DVA-3003 Video Gaming Accessories User Manual
- Viking Electronics DVA-2W Video Gaming Accessories User Manual
- Viking Electronics DVA- 1003B Video Gaming Accessories User Manual