
MAX 5100-PM Guide
User manual for MAX 5100-PM
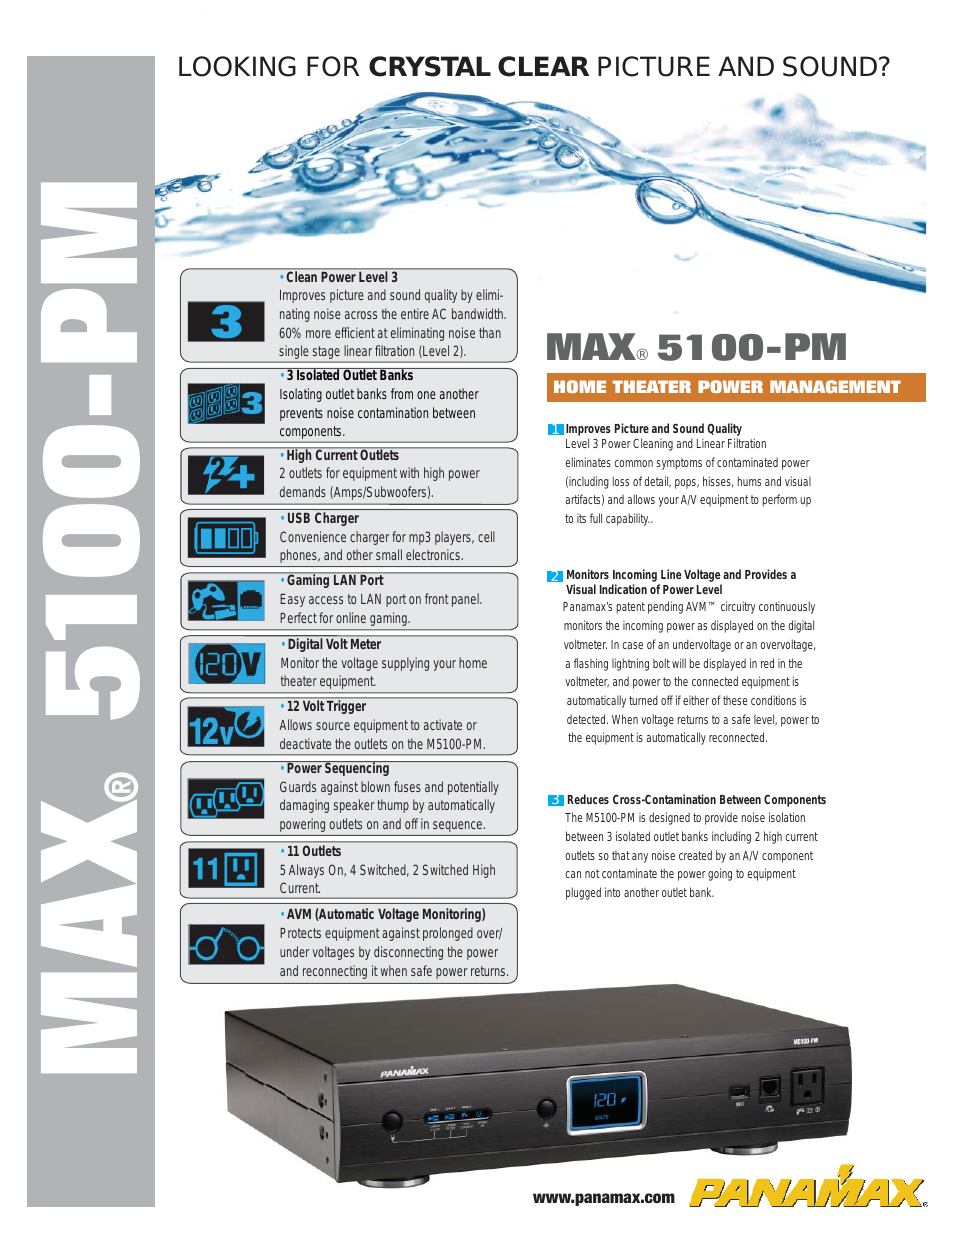
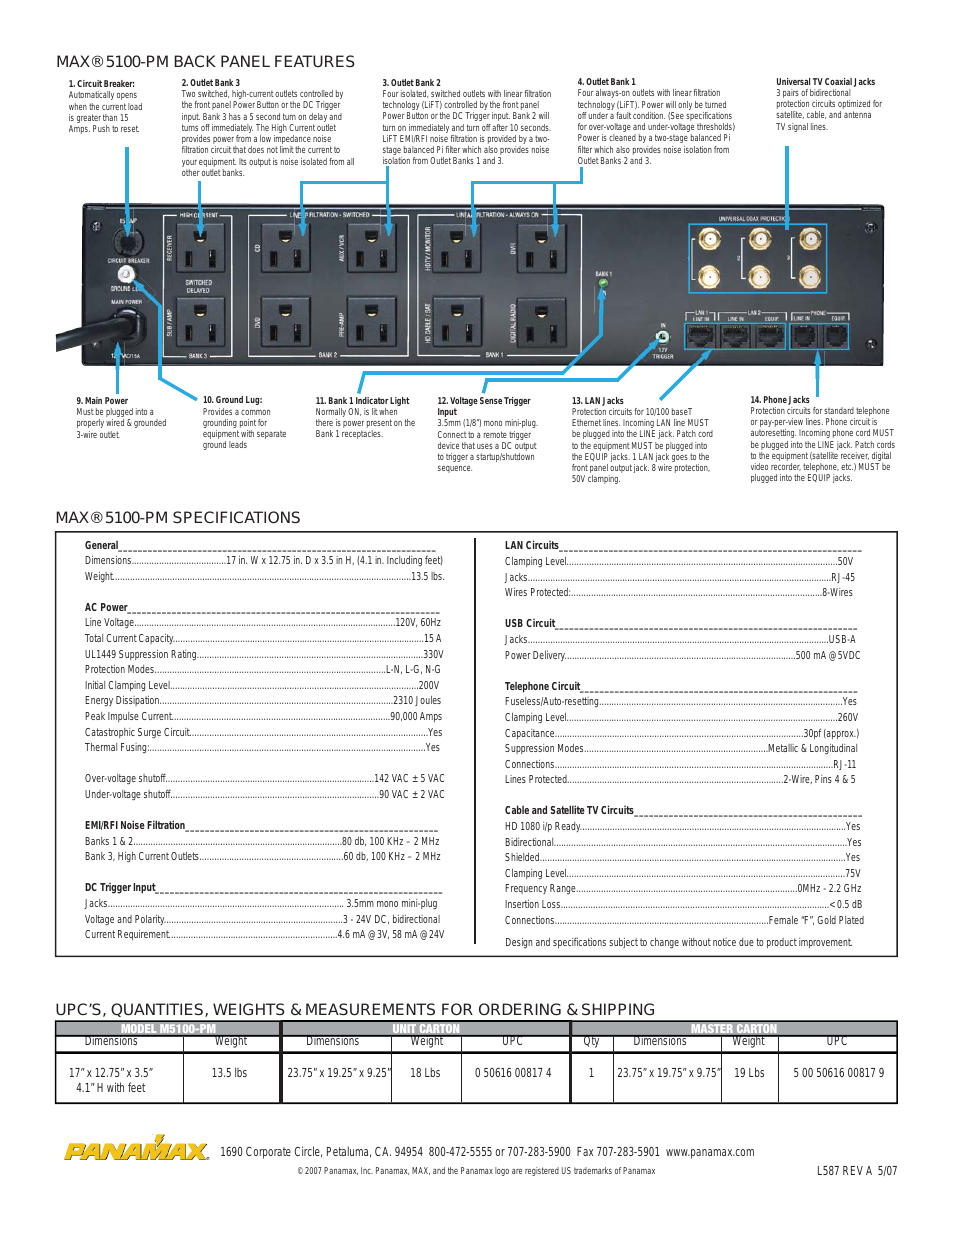
Table of contents
Document Outline
- Contents
- Operation 1-1
- Introduction 1-1
- Before you Begin 1-1
- Features of the TW-47 System 1-1
- Description of the TW-47 1-2
- Connecting the TW-47 to the Base Station Radio 1-3
- Building Your Custom Cable 1-4
- Option Settings 1-7
- Check Out and Operation of the TW-47 System 1-9
- TW-47 Front Panel Controls and Lights 1-11
- Rear Panel of TW-47 1-12
- Installation 2-1
- Specifications 3-1
- Limited Warranty 4-i
- Warranty Period 4-i
- Technical Support 4-ii
- Warranty Repairs and Returns 4-iii
- Non-Warranty Repairs and Returns 4-iv
- Extended Warranty 4-iv
- Liability 4-v
- 1. Read these instructions.
- 2. Keep these instructions.
- 3. Heed all warnings.
- 4. Follow all instructions.
- 5. Do not use this apparatus near water.
- 6. Clean only with dry cloth.
- 7. Do not block any ventilation openings. Install in accordance with the manufacturer’s instructions.
- 8. Do not install near any heat sources such as radiators, heat registers, stoves, or other apparatus (including amplifiers) that produce heat.
- 9. Only use attachments/accessories specified by the manufacturer.
- 10. Use only with the cart, stand, tripod, bracket, or table specified by the manufacturer, or sold with the apparatus. When a cart is used, use caution when moving the cart/apparatus combination to avoid injury from tip-over.
- 11. Unplug this apparatus during lightning storms or when unused for long periods of time.
- 12. Refer all servicing to qualified service personnel. Servicing is required when the apparatus has been damaged in any way, su...
- 13. WARNING: To reduce the risk of fire or electric shock, do not expose this product to rain or moisture.
- 1 Operation
- Introduction
- Before you Begin
- Features of the TW-47 System
- Description of the TW-47
- Connecting the TW-47 to the Base Station Radio
- Building Your Custom Cable
- 1. Obtain or make a cable using mini or micro plugs that fit your radio. Use single conductor shielded wire for each cable. Mini...
- 2. The next step will be to set the type and level of microphone. The TW-47 has three internal jumpers that can be set for speci...
- 3. The most difficult setting is getting your particular radio to key properly. Every radio has a different method of externally...
- Option Settings
- Check Out and Operation of the TW-47 System
- 1. Turn on the base station radio and the remote radio. Make sure you have fresh or fully charged batteries. With the external jacks on the base station removed, make sure the radios are communicating with each other.
- 2. Set the base station volume control to approximately half volume. Have one person listen on the intercom and have another per...
- 3. CHECKING OUT THE BASE STATION TRANSMITTER: From the main station or remote station, turn on the talk button for the channel t...
- 4. Remember that communication to the remote walkie- talkie is “push-to-talk.” You must release the call button to receive communications from the remote walkie- talkies.
- 5. Certain Clear-Com stations can be set up so that the call signalling can be activated automatically when the “talk” button is...
- TW-47 Front Panel Controls and Lights
- Figure 1-7: Front View of TW-47
- 1. RECEIVE LEVEL ADJUST. Use to adjust the receive level of the base station two-way radio when there is no external volume control on the base station radio.
- 2. TRANSMIT LEVEL ADJUST. Use transmit level adjust to set the level of the intercom’s audio as heard at the remote station walkie-talkie.
- 3. TRANSMIT ON LIGHT. The light illuminates when a call signal is being sent from the intercom system.
- 4. AUDIO LEVEL LIGHTS. Red and green lights indicate the audio level in the intercom system. Use these indicators to adjust the ...
- Rear Panel of TW-47
- Figure 1-8: Rear View of TW-47
- 5. INTERCOM LINE CONNECTOR. Use the three-pin female XLR connector on the TW-47’s back panel to connect the unit to the intercom channel. As with other Clear-Com remote stations, power is provided through the cable.
- 6. TWO-WAY RADIO CONNECTOR. Use the DB-9F connector to connect the TW-47 to the base-station radio.
- 2 Installation
- Wiring Cables for Specific Radio Types
- TW-47 Technical Specifications
- Warranty Period
- Technical Support
- Warranty Repairs and Returns
- Non-Warranty Repairs and Returns
- Extended Warranty
- Liability
Related manuals for MAX 5100-PM


New Manuals
- ZyXEL Communications ZyXEL G-162 Video Gaming Accessories User Manual
- ZyXEL Communications EW103U/A Video Gaming Accessories User Manual
- Western Telematic RSM-8 Video Gaming Accessories User Manual
- Western Telematic RSM-32DC Video Gaming Accessories User Manual
- Western Telematic RSM-32 Video Gaming Accessories User Manual
- Western Telematic RSM-16DC Video Gaming Accessories User Manual
- Western Telematic RSM-16 Video Gaming Accessories User Manual
- Viking Electronics FBI-1A Video Gaming Accessories User Manual
- Viking Electronics DVA-500A Video Gaming Accessories User Manual
- Viking Electronics DVA-3003 Video Gaming Accessories User Manual
- Viking Electronics DVA-2W Video Gaming Accessories User Manual
- Viking Electronics DVA- 1003B Video Gaming Accessories User Manual