
EZBULLET-PRO Guide
User manual for EZBULLET-PRO
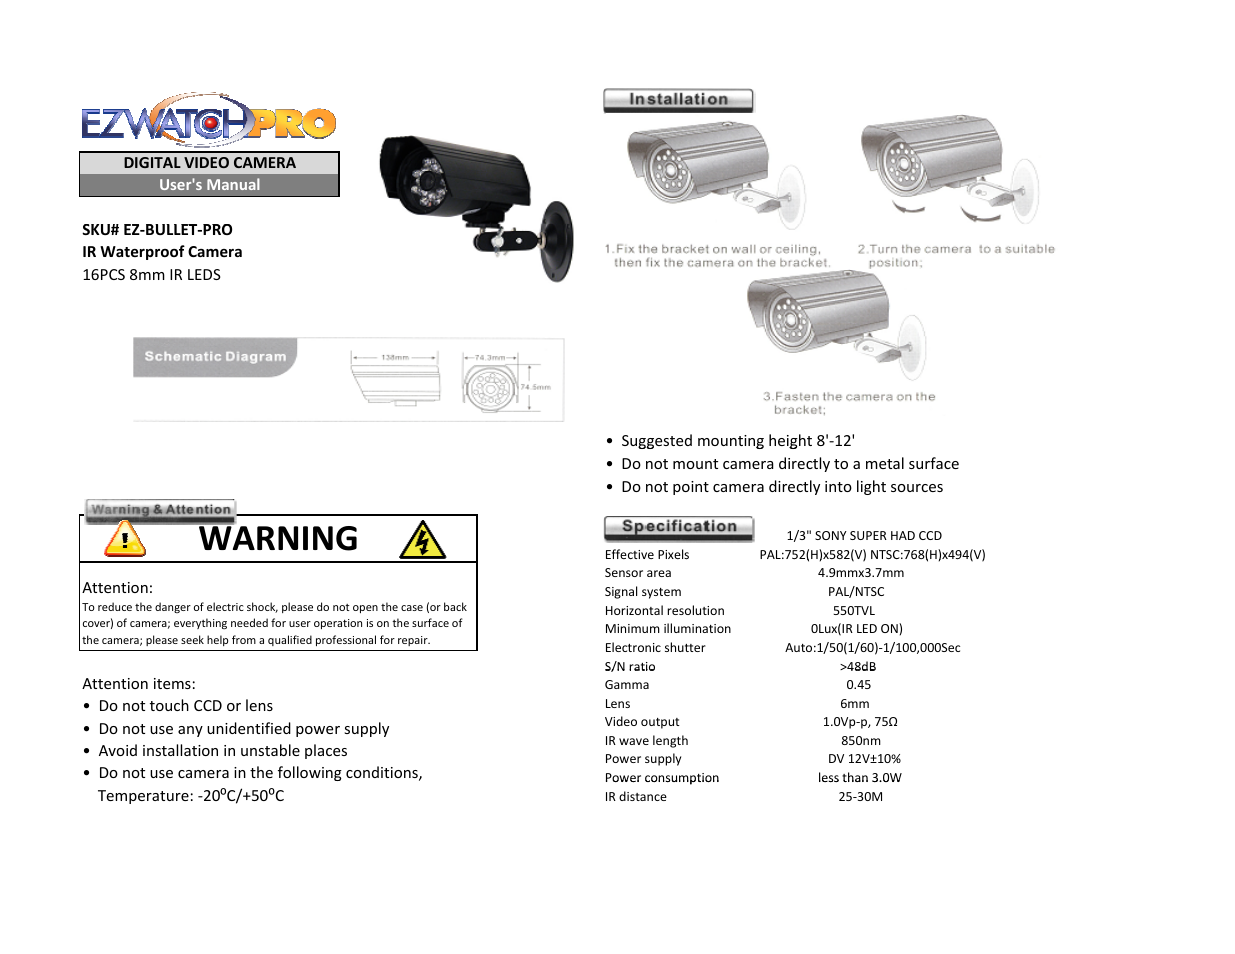
Table of contents About This Manual Safety Getting Started Control* Operation Getting the Most Out of Your Appliance Cleaning and Maintenance Service STATEMENT OF LIMITED PRODUCT WARRANTY Concernant ce guide Sécurité Mise en œuvre Contrôles* Fonctionnement Profiter pleinement de cet appareil Nettoyage et entretien
Document Outline
- About This Manual 1
- Safety 2
- Getting Started 4
- Operation 8
- Getting the Most Out of Your Appliance 12
- Cleaning and Maintenance 20
- Service 24
- Convection Cooking Chart— Baked Goods/Entrees 26
- Cooking Chart—Meats 28
- General Tips
- Bake
- Convection Bake (some models)
- True Convection
- Tips
- To replace the halogen bulb on the oven sidewall:
- 1. Turn off circuit breaker.
- 2. Remove oven racks.
- 3. Slide the tip of a flat blade screw driver between the fixing clip and the lamp housing.
- 4. Support the glass lens cover with two fingers along the bottom edge to prevent the cover from falling to the bottom of the oven.
- 5. Gently twist the flat blade screw driver to loosen the glass lens cover.
- 6. Remove the glass lens cover and fixing clip.
- 7. Remove the bulb by grasping and sliding the bulb straight out until the two prongs have cleared the ceramic holder.
- 8. Do not touch the glass of the new replacement bulb with your fingers. It will cause the bulb to fail when it first lights. Grasp the replacement bulb with a clean paper towel or facial tissue with the prongs facing down. Locate the two prongs in t...
- 9. Press in to seat the bulb.
- 10. Slide the protective lens into the holder clip and push the other end until the fixing clip snaps back into the housing.
- 11. Turn on circuit breaker.
- To replace the halogen bulb on the oven sidewall:
- Tips
- Convection Broil/Max Convection Broil
- Speed Convection
- Warm
- Proof (some models)
- Dehydrate
- 11–15
- 11–15
- 10–15
- 2–4
- 12–16
- 9–13 8–12
- 12–17
- 15–17
- 7–12
- 15–20
- Dry at 100 ºF 4–6 hours.
- Dry at 100 ºF 4–6 hours.
- Rotisserie
- NOTE:
- Tip
- Assembling the Rotisserie
- 1. Insert rotisserie rack half way into the oven on rack position 4.
- 2. Slide the left fork onto the skewer and tighten the screw.
- 3. Slide meat or poultry for roasting onto the skewer.
- 4. Slide the right fork onto the skewer and tighten the screw.
- 5. Check the balance of the food on the skewer by rolling the skewer in the palms of your hands. Food not evenly balanced will not cook evenly.
- 6. Place the rotisserie skewer onto the rack.
- 7. Place the skewer rack into the oven and insert the drive shaft into the opening on the back oven wall.
- 8. If necessary, turn the rotisserie skewer slightly so that the drive shaft fits properly into the opening.
- 9. Insert flat rack on position 0 and insert broil pan to catch drippings.
- Trussing Poultry for the Rotisserie
- 1. Slip one of the forks on the skewer with the tines pointing to the tip of the skewer. Loosely tighten the screw to keep it from slipping.
- 2. Insert the skewer through the bird securing with the fork.
- 3. Cut 24” of kitchen string and lay it under the bird, breast side up, with equal lengths of string on each side.
- 4. Wrap each end of the string around each of the wings; catch each wing tip as the string is brought tightly together at the top and knotted. Do not cut off the extra string.
- 5. Cut another 20” of string and lay it under the back. Wrap it around the tail then around the skewer. Cinch tightly.
- 6. Pull legs forward; cross them on top of the skewer; bring string around and tie a tight knot.
- 7. Connect the string holding the legs to the string holding the wings; then knot. Add the other fork and push tines into the drumsticks to secure.
- 8. Check the balance by rolling the skewer in your palms. The bird should not rotate or be loose in any way. If so, redo the trussing. The bird will not cook evenly if it moves on the skewer.
- Rotisserie
- Cleaning
- Maintenance
- Replacing an Oven Light
- CAUTION:
- To replace the halogen bulb on the oven ceiling:
- 1. Turn off power to the oven at the main power supply (fuse or breaker box).
- 2. Remove the glass cover by unscrewing it.
- 3. Remove the halogen bulb and replace. Grasp the new bulb with a clean, dry cloth.
- 4. Screw the glass cover back on.
- 5. Turn power back on at the main power supply (fuse or breaker box).
- To replace the halogen bulb on the oven ceiling:
- CAUTION:
- Removing the Oven Door
- CAUTION:
- To remove the oven door:
- 1. Be sure to read the above CAUTION before attempting to remove the door.
- 2. Open the door completely.
- 3. Flip levers on hinges toward you.
- 4. Holding the door firmly on both sides and using both hands, close the door gently until it stops against the levers, about 30º from the closed position.
- 5. Carefully lift the door up and out of the hinge slots. Hold firmly; the door is heavy.
- 6. Place the door in a convenient and stable location for cleaning.
- 1. Hold the door firmly in both hands.
- 2. Hold the door at a 30º angle from the closed position and insert hinges into the slots. You may need to rock the door forward and backward slightly to seat the hinge feet.
- 3. The door may need to be removed and re- inserted until the hinges sit correctly in the slots.
- 4. Open door all the way to expose hinges, levers, and slots.
- 5. Push levers forward and down until seated on the bracket.
- 6. Close and open door slowly to be sure it is correctly and securely in place. Door must be straight, not crooked.
- To remove the oven door:
- CAUTION:
- Replacing an Oven Light
- What this Warranty Covers & Who it Applies to
- How Long the Warranty Lasts
- Repair/Replace as Your Exclusive Remedy
- Out of Warranty Product
- Warranty Exclusions
- Roast
- Convection Roast
- Broil/Max Broil
- Concernant ce guide 1
- Sécurité 2
- Mise en œuvre 4
- Fonctionnement 8
- Profiter pleinement de cet appareil 12
- Nettoyage et entretien 20
- Service 24
- Instructions de sécurité importantes
- LIRE ET CONSERVER CES INSTRUCTIONS
- AVERTISSEMENT :
- AVERTISSEMENT
- 1) que l’on possède un extincteur de classe ABC et que l’on sait comment l’utiliser.
- 2) que le feu est petit et contenu à l’endroit où il a commencé.
- 3) que le service des incendies a été appelé.
- 4) que l’on peut combattre le feu avec le dos vers une sortie.
- Prévention de brûlures
- Sécurité – enfants
- ATTENTION :
- Pièces*
- Accessoires
- Insertion des grilles
- ATTENTION :
- Grille plate
- Mise en place de la grille plate ::
- Retrait de la grille plate :
- Grille télescopique
- Mise en place de la grille télescopique ::
- 1. Maintenir la grille à angle droit.
- 2. Insérer les crochets arrière dans les fixations accessoires.
- 3. Tenir la grille droite.
- 4. Pousser la grille jusqu’à ce qu’elle soit égale avec les crochets avant.
- 5. Soulever la grille vers le haut.
- 6. Pousser la grille complètement.
- 7. Insérer les crochets avant de la grille dans les fixations accessoires. Il est très important d'insérer la grille correctement (voir illustration agrandie).
- REMARQUE :
- Concernant cet appareil
- Caractéristiques de base
- Caractéristiques spéciales
- Temps cuisson
- ATTENTION :
- Régler le temps de cuisson :
- 1. Régler le mode cuisson et température.
- 2. Presser SELECT deux fois (pour le four double, le four supérieur est sélectionné). Presser une autre fois pour choisir le four inférieur. TEMPS CUISSON et le chiffre clignotant 0 :00 figurent à l’affichage. Pour le four double, SUPÉRIEUR o...
- 3. Utiliser les touches + et – pour régler le temps cuisson. Ex. : temps cuisson réglé à 1 h 30.
- REMARQUES :
- Régler le temps de cuisson :
- ATTENTION :
- Temps arrêt
- ATTENTION :
- REMARQUE :
- Régler temps cuisson et temps arrêt :
- 1. Régler le temps cuisson tel que décrit précédemment.
- 2. Presser SELECT. Temps cuisson, les chiffres du temps cuisson clignotants s’affichent.
- 3. Utiliser les touches + et – pour régler le temps cuisson (régler l’heure en cours)
- 4. Presser SELECT TEMPS PENDULE disparaît et le temps arrêt figure.
- 5. Utiliser + et – pour régler le temps arrêt. Ex. : réglé à 12 : 00.
- Régler temps cuisson et temps arrêt :
- REMARQUES :
- REMARQUE :
- ATTENTION :
- Mode sabbat
- Sonde
- Décalage température
- Temps cuisson
- Généralités
- Cuisson
- Cuisson à convection (certains modèles)
- Convection réelle
- Entretien
- Remplacement de l’ampoule du four
- ATTENTION :
- Remplacer l’ampoule halogène dans la paroi latérale :
- 1. Fermer le coupe-circuit.
- 2. Enlever les grilles.
- 3. Insérer la lame plate du tournevis entre la pince de fixation et le boîtier.
- 4. Tenir le couvercle en verre avec deux doigts le long du bord pour éviter que le couvercle ne tombe au fond du four.
- 5. Tourner délicatement la lame pour dégager le couvercle en verre.
- 6. Enlever le couvercle et la pince de fixation
- 7. Enlever l’ampoule en saisissant et faisant glisser l’ampoule droite jusqu’à ce que les 2 tiges se dégagent du support en céramique.
- 8. Ne pas toucher au verre de l’ampoule de rechange avec les doigts, sinon elle grillera. Saisir l’ampoule de rechange avec un essuie-tout ou un mouchoir de papier, les tiges face vers le bas. Placer les 2 tiges dans le support en céramique de f...
- 9. Presser l’ampoule en place.
- 10. Faire glisser la lentille de protection dans la pince et pousser l’autre extrémité jusqu’à ce que la pince de fixation s’enclenche en place dans le boîtier.
- 11. Réenclencher le coupe-circuit.
- Remplacer l’ampoule halogène dans la paroi latérale :
- ATTENTION :
- Remplacement de l’ampoule du four
- Gril à convection/ gril max à convection
- Convection rapide
- Chaud
- Levage (certains modèles)
- Déshydratation
- 11 а 15
- 11 а 15
- 10 а 15
- 2 а 4
- 12 а 16
- 9 а 13 8 а 12
- 12 а 17
- 15 а 17
- 7 а 12
- 15 а 20
- Sécher à 100 °F 4 à 6 hours.
- Sécher à 100 °F 4 à 6 hours.
- Total 60 à 70 min.
- Assemblage du tournebroche
- 1. Insérer la grille à mi- chemin en position 4.
- 2. Faire glisser la fourche gauche dans la broche et serrer la vis.
- 3. Insérer la viande ou la volaille sur la broche.
- 4. Faire glisser la fourche droite dans la broche et serrer la vis.
- 5. Vérifier l’équilibre de l’aliment sur la broche en la roulant entre les paumes des mains. Un aliment mal équilibré ne cuira pas uniformément.
- 6. Placer la briche sur la grille.
- 7. Placer la grille dans le four et insérer l’arbre d’entraînement dans l’ouverture sur la paroi arrière du four.
- 8. Au besoin, tourner la broche légèrement afin que l’arbre d’entraînement s’insère adéquatement dans l’ouverture.
- 9. Insérer la grille plate en position 0 et placer la lèchefrite pour capter les égouttements.
- Ficelage de la volaille
- 1. Faire glisser une des fourches sur la broche avec les dents pointant vers la pointe de la broche. Serrer lâchement la vis pour l’empêcher de glisser.
- 2. Insérer la broche dans la volaille en la maintenant en place avec la fourche.
- 3. Couper une longueur de 24 po de corde et la placer sous la volaille, poitrine vers le haut. Avoir la même longueur de corde de chaque côté.
- 4. Enrouler chaque extrémité de la corde autour des ailes en serrant la corde ensemble vers le haut et en y faisant un nœud. Ne pas couper l’excédant de la corde.
- 5. Couper une autre longueur de 20 po et la mettre sous le dos. Enrouler autour de la queue, ensuite autour de la broche, enrouler la corde et faire un nœud serré.
- 6. Tirer les cuisses vers le haut sur la broche, enrouler la corde et faire un nœud serré.
- 7. Rassembler toutes les cordes et faire un nœud. Ajouter l’autre fourche et pousser les dents dans les cuisses pour bien maintenir.
- 8. Vérifier l’équilibre en roulant la broche dans les paumes. La volaille ne doit pas tourner ni être lâche. Si tel est le cas, rattacher la volaille, car elle ne cuira pas uniformément.
- Assemblage du tournebroche
Related manuals for EZBULLET-PRO

New Manuals
- ZyXEL Communications ZyXEL G-162 Video Gaming Accessories User Manual
- ZyXEL Communications EW103U/A Video Gaming Accessories User Manual
- Western Telematic RSM-8 Video Gaming Accessories User Manual
- Western Telematic RSM-32DC Video Gaming Accessories User Manual
- Western Telematic RSM-32 Video Gaming Accessories User Manual
- Western Telematic RSM-16DC Video Gaming Accessories User Manual
- Western Telematic RSM-16 Video Gaming Accessories User Manual
- Viking Electronics FBI-1A Video Gaming Accessories User Manual
- Viking Electronics DVA-500A Video Gaming Accessories User Manual
- Viking Electronics DVA-3003 Video Gaming Accessories User Manual
- Viking Electronics DVA-2W Video Gaming Accessories User Manual
- Viking Electronics DVA- 1003B Video Gaming Accessories User Manual