
EZ-EYE Guide
User manual for EZ-EYE

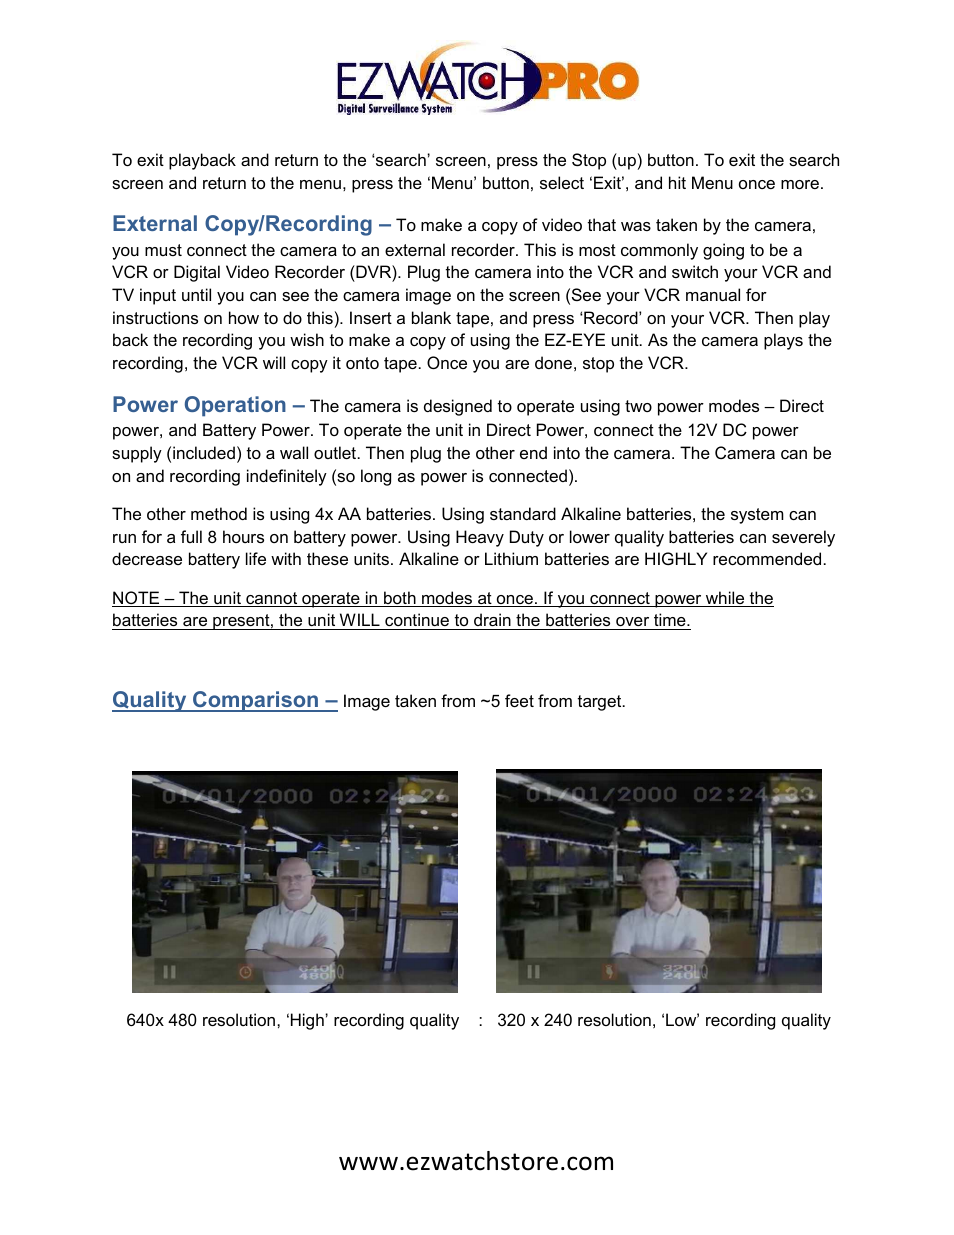
Table of contents
Document Outline
- About This Manual
- You can get the most out of your new oven by reading this manual from beginning to end. This way you will systematically get to know your appliance and become familiar with its operation and features.
- The manual consists of the following sections:
- . The "Safety" section provides information on how to safely operate your oven.
- . "Getting Started" introduces you to the oven components and features.
- . The "Operation" section offers you step-by-step instructions on how to operate your oven.
- . In "Getting the Most Out of Your Appliance" you can find a list of many common foods with the appropriate oven mode, temperature, rack position and bake time. This section also provides you with several bakeware and preparation tips.
- . "Cleaning and Maintenance" provides you with information on how to clean and care for the various oven parts.
- . The "Service" section includes your warranty and do-it-yourself troubleshooting tips.
- . Pay special attention to the important safety instructions in the "Safety" section.
- Safety
- Important Safety Instructions
- Read and save these instructions
- Warning:
- When properly cared for, your new appliance has been designed to be safe and reliable. Read all instructions carefully before us...
- Have the installer show you the location of the circuit breaker or fuse. Mark it for easy reference.
- This appliance must be properly installed and grounded by a qualified technician. Connect only to a properly grounded outlet. Refer to the Installation Instructions for details.
- This appliance is intended for normal family household use only. It is not approved for outdoor use. See the Warranty. If you have any questions, contact the manufacturer.
- Do not store or use corrosive chemicals, vapors, flammables or nonfood products in or near this appliance. It is specifically de...
- Do not operate this appliance if it is not working properly, or if it has been damaged. Contact an authorized servicer.
- Do not obstruct oven vents.
- Do not repair or replace any part of the appliance unless specifically recommended in this manual. Refer all servicing to a factory authorized service center.
- In the event of an error the display flashes and beeps continuously. If this happens during self-clean, disconnect appliance from the power supply and call a qualified technician.
- In the event of an error the display flashes and beeps continuously. Disconnect appliance from the power supply and call a qualified technician.
- Do not use aluminum foil or protective liners to line any part of the appliance, especially the oven bottom. Installing these liners may result in risk of electric shock or fire.
- If materials inside an oven should ignite, keep door closed. Turn off the appliance, and disconnect the circuit at the circuit breaker box.
- Use this appliance only for its intended purpose as described in this manual. For example, never use the appliance for warming or heating the room. Never use the appliance for storage.
- Always have a working smoke detector near the kitchen.
- In the event that personal clothing or hair catches fire, drop and roll immediately to extinguish flames.
- Important Safety Instructions
- Read and save these instructions
- Smother flames from food fires other than grease fires with baking soda. Never use water on cooking fires.
- Have an appropriate fire extinguisher available, nearby, highly visible and easily accessible near the oven.
- WARNING - TO REDUCE THE RISK OF PERSONAL INJURY IN THE EVENT OF A GREASE FIRE, OBSERVE THE FOLLOWING:
- . SMOTHER FLAMES with a close-fitting lid, cookie sheet, or metal tray, then turn off the burner. EXERCISE CAUTION TO PREVENT BURNS. If the flames do not go out immediately, EVACUATE AND CALL THE FIRE DEPARTMENT.
- . NEVER PICK UP A FLAMING PAN - You could be burned.
- . DO NOT USE WATER, including wet rags or towels - a violent steam explosion will result.
- . Use an extinguisher ONLY if:
- DO NOT TOUCH HEATING ELEMENTS OR INTERIOR SURFACES OF OVEN - Heating elements may be hot even though they are dark in color. Int...
- Exercise caution when opening the appliance. Standing to the side, open the door slowly and slightly to let hot air and/or steam...
- Do not heat or warm unopened food containers. Build-up of pressure may cause the container to burst and cause injury.
- Always place oven racks in desired location while oven is cool. If a rack must be moved while oven is hot, do not let potholder contact the heating elements.
- Always use dry potholders. Moist or damp potholders on hot surfaces may result in burns from steam. Do not let potholder touch hot heating elements. Do not use a towel or other bulky cloth.
- Secure all loose garments, etc. before beginning. Tie long hair so that it does not hang loose, and do not wear loose fitting clothing or hanging garments, such as ties, scarves, jewelry, or dangling sleeves.
- When children become old enough to use the appliance, it is the legal responsibility of the parents or legal guardians to ensure that they are instructed in safe operation of the appliance by qualified persons.
- Important Safety Instructions
- Read and save these instructions
- Do not allow anyone to climb, stand, lean, sit, or hang on any part of an appliance, especially a door, warming drawer or storage drawer. This can damage the appliance, and the unit may tip over, potentially causing severe injury.
- Do not allow children to use this appliance unless closely supervised by an adult. Children and pets should not be left alone or...
- CAUTION - Items of interest to children should not be stored in an appliance, in cabinets above an appliance or on the backsplash. Children climbing on an appliance to reach items could be seriously injured.
- Do not clean the appliance while it is still hot. Some cleaners produce noxious fumes when applied to a hot surface. Wet cloths or sponges can cause burns from steam.
- IMPORTANT SAFETY NOTICE: The California Safe Drinking and Toxic Enforcement Act requires the Governor of California to publish a...
- When self-cleaning, confirm that the door locks and will not open. If the door does not lock, do not run Self-Clean. Contact service.
- Wipe out excessive spillage before self-cleaning the oven.
- Birds have very sensitive respiratory systems . Keep pet birds out of the kitchen or other rooms where kitchen fumes could reach...
- Keep oven free from grease build up.
- Do not place food directly on oven bottom.
- Follow the manufacturer's directions when using cooking or roasting bags.
- Do not clean parts or accessories in the self-clean oven.
- Control Panel
- The cooling fan runs during all cooking modes. The fan can be heard when it is running, and warm air may be felt as it is released from the oven vent. The fan may also run after the oven is off.
- The oven vent is located at the bottom of the unit. Warm air may be released from the vent before, during and after cooking. It ...
- The convection fan operates during all convection modes. When the oven is operating in a convection mode, the fan turns off automatically when the door is opened. The convection fan may also run during self-clean.
- The oven bottom conceals the lower heating element. As a result the element is protected from damage and spills.
- Note: Do not place food directly on the oven bottom.
- Warning:
- Do not use aluminum foil or protective liners to line any part of the appliance, especially the oven bottom. Installation of these liners may result in a risk of electric shock or fire.
- Do not clean in the self-clean oven.
- Use for broiling and roasting. Do not clean in the self-clean oven.
- The rack is designed with a stop so it will stop before coming completely out of the oven and not tilt.
- Caution:
- To avoid burns, place oven racks in desired positions before turning oven on. Always use oven mitts when the oven is warm. If a rack must be moved while the oven is hot, do not let oven mitts contact hot heating elements.
- You only have to press lightly on the touchpads to operate them. The touchpads will not work if you press several of them at once, such as when cleaning them.
- TIMER START/OFF - Starts or stops the timer.
- ON/OFF - Turns the oven on and off.
- COOK TIME - Used to set a timed mode. At the end of the cooking time, the oven turns off automatically.
- EASY COOK - Press to select the easy cook menu.
- STOP TIME - Used to delay the start of a timed mode. When you enter the stop time, the oven automatically calculates the proper start time.
- FAVORITES - Press to select the favorites menu.
- CLOCK - Press to set the clock.
- FAST PREHEAT - Turns Fast Preheat on or off.
- PANEL LOCK - Press and hold for four seconds to turn the panel lock on or off. Prevents the oven from being turned on or its settings from being changed accidentally.
- OVEN TEMP - Displays the programmed oven temperature. When the temperature appears in the display, you can change it using the numeric touchpads.
- PAUSE/STOP - Press once to pause. Press twice to stop the oven and clear the programmed oven mode. Press and hold for two seconds to turn off the oven.
- OVEN LIGHT - Turns the oven light on or off. The light cannot be turned on during self-cleaning.
- START - Confirms settings and starts the oven. Turns the oven on after it is set to PAUSE.
- INFO - Press to view information on the current oven mode.
- CLEAR - Clears the last entry.
- TIMER - Press to set the timer.
- BACK - Returns to the previous screen.
- Cooking Mode Symbol - Shows the cooking elements that are active for the mode that is selected. The symbol will also display a fan if the convection fan is utilized in the selected mode.
- Cook Time Symbol - Used in conjunction with Cook Time mode. Shows the amount of time that the oven mode will run before turning off automatically.
- Fast Preheat Symbol - Is displayed when Fast Preheat is active.
- Stop Time Symbol - Used when delaying the start of a timed oven mode. Shows the time of day that the oven mode will automatically end.
- Door Locking Indicator - Symbol is displayed during and after the self-clean mode when the door is locked. DO NOT attempt to open the door while the lock symbol is present.
- Preheat Monitor - Shows the progress of the preheat process. When all of the five bars are lit, preheat is complete. Some modes start with all bars lit.
- Before Using the Oven for the First Time
- . Oven must be properly installed by a qualified technician before use.
- . Remove all packing materials from inside and outside the oven.
- . While cool, wipe with a clean, damp cloth and dry.
- . There may be a slight odor during first uses; this is normal and will disappear.
- . Optimum cooking results depend on proper cookware being used.
- . Read and understand all safety precautions and Use and Care Manual information prior to operating.
- Operation
- Your new oven combines popular functions, premium cooking results and simple operation.
- The "Easy Cook" function makes it possible to select the desired food type using the display menu. The oven then starts automatically, using the correct cooking mode and temperature.
- While cooking, if a dish turns out particularly well, the settings for this dish can be stored in "Favorites" and can be retrieved at any time.
- This oven can also provide assistance after cooking: Thanks to "Self-Clean" mode, hours of scrubbing into the darkest corners of...
- Clear labeling of the touch keys make operating the oven very easy. In addition, messages on the display provide assistance when adjusting settings. This manual includes all instructions for operating the oven.
- Press the ON/OFF key.
- The last oven mode selected and the default temperature appear in the display.
- Press the ON/OFF key.
- The oven returns to standby mode.
- Your new oven includes time functions that require the current time and date to be set. It is therefore necessary to set the clock and date first. The text on the display guides you step-by-step through the menu.
- In order to access the "Clock" menu, a timer or cook time cannot be running.
- The default display language is English. However, you can change the language in the user settings.
- Note: The oven must be turned off in order to access the menu.
- While the oven is preheating, the current oven temperature is displayed. Next to the current temperature is a preheat monitor th...
- . The adjustable temperature ranges are limited. A message appears in the display if an invalid temperature is entered.
- . The cooking mode and temperature can be changed at any time during oven operation.
- . Press INFO once to obtain information on the selected cooking mode. Press INFO twice to obtain information on the recommended rack position.
- The maximum heating time is limited. If you forget to turn off the oven, it turns off automatically after a set period of time (see table below), unless in Easy Cook mode or with Cook Time.
- The maximum time for Sabbath mode is 74 hours. For all other cooking modes, the maximum time allowed depends on the temperature:
- 100 - 200
- 30 - 120
- 24 h
- 201 - 550
- 121 - 300
- 12 h
- Heating stops until a setting is changed.
- The panel lock is a child safety mechanism to prevent children from accidentally turning on the oven or changing an oven setting.
- To turn the panel lock on, press and hold the PANEL LOCK key for four seconds. "Panel locked" will appear in the display.
- To turn the panel lock off, press and hold the PANEL LOCK key for four seconds. The message in the display will disappear.
- When panel lock is activated, all keys are locked except for the following:
- A beep sounds when the timer ends. Press TIMER START/OFF. The timer and beep are canceled.
- A running timer can also be canceled by pressing TIMER START/OFF.
- Fast Preheat heats the oven quicker than standard preheat. It is available for Bake, Roast, Convection Bake, Convection Roast and Pizza modes.
- The oven is preheated when all of the bars are visible and a beep sounds. Fast Preheat is then complete. The flash symbol disappears.
- The special features provide you with additional conveniences when cooking.
- Learn more about these special features in the following sections:
- Use the COOK TIME feature to operate the oven mode for a set period of time. The oven starts immediately and then turns off automatically when the set time is up.
- Caution:
- To maintain food safety, do not leave food in the oven for more than one hour before or after cooking.
- Note: it is also possible to press only two numbers (e.g. 4 and 5) and to confirm with COOK TIME.
- To change the cooking time after the oven has been started, press COOK TIME. You can then set a new cooking time.
- Use Stop Time to delay the start of a Cook Time. Enter the time that you want the mode to end. The oven calculates the proper start time. It starts and stops automatically.
- Caution:
- To maintain food safety, do not leave food in the oven for more than one hour before or after cooking.
- To change a delayed timed mode without starting the oven, press STOP TIME. You can then set a new stop time and change the oven mode and temperature.
- . It is not possible to set a stop time when using a probe (some models).
- . The maximum stop time setting allowed in 12-hour display mode is 11:59hours, or 23:59 hours in 24-hour display mode.
- . It is also possible to set a stop time without setting a cook time. Then the oven starts immediately and stops automatically.
- Easy Cook contains functions with pre-programmed settings. The heating mode, temperature and cooking time are automatically activated based on the items you choose in the menus. However, it is possible to change temperature and cooking time manually.
- Caution:
- To maintain food safety, do not leave food in the oven for more than one hour before or after cooking.
- The following foods are available:
- Baked Goods
- Cookies
- One Rack
- Two Racks
- Three Racks
- no weight
- no weight
- no weight
- 3
- 2+5
- 1+3+5
- Cakes
- Sheet Cake
- Cupcakes
- Round Cake
- no weight
- no weight
- no weight
- 3
- 3
- 3
- Biscuits
- -
- no weight
- 3
- Brownies
- -
- no weight
- 3
- Pie and Pizza
- Frz. Rise Pizza
- no weight
- 3
- Frz. Thin Pizza
- no weight
- 3
- Frozen Pie
- no weight
- 2
- Fresh Pie
- no weight
- 2
- Poultry
- Chicken
- Whole
- Breast
- 3.5-5
- no weight
- 2
- 3
- Turkey
- Whole Unstuffed
- Breast
- 10-25
- 4-8
- 1
- 2
- Meats
- Rib Eye Roast
- Medium Rare
- Medium
- 3-5.5
- 3-5.5
- 2
- 2
- Pork Loin
- Boneless
- 1.5-6
- 2
- Spiral Ham
- 6-10
- 2
- The remaining programmed cooking time appears in the display. The time when the food will be done cooking is displayed next to t...
- . When using an automatic program, it is not necessary to preheat the oven when roasting meat or poultry.
- . It is possible to change the oven temperature and time for some programs.
- . Wrap spiral ham with aluminum foil prior to roasting.
- . Turkey may need to be covered after approximately 2 hours of roasting to prevent over browning.
- . After roasting beef and pork, let the meat stand covered with aluminum foil for 10 minutes in order to reach the final internal temperature.
- . The height of the rib eye roast should be 2 º” to 3”.
- . At the end of the automatic program check the internal temperature of the meat with a meat thermometer in order to ensure food safety.
- Use Favorites to store the settings for your favorite dishes.
- There are four memory settings available for this feature. The temperature, cooking mode and cooking time are activated automatically based on the stored items. However, it is possible to change temperature and cooking time manually.
- Note: it is only possible to store settings after cooking.
- At the end of the programmed time, the oven turns off and a beep sounds. Open the oven door or press COOK TIME to turn off the beep.
- Sabbath Mode is for religious faiths with "no work" requirements on the Sabbath. Sabbath Mode must be activated in the user settings (default setting: On).
- The user settings allow you to customize your oven. Use this menu to change the following:
- Clock
- Display mode: 12-hour or 24-hour
- 12-hour
- Language
- Language setting: English, Français, Español, Deutsch
- English
- Beep length
- Beep length setting: Short, Medium, Long
- Medium
- Beeps
- Beeps for each key: Yes or No
- Yes
- Temperature F or C
- Temperature mode: Fahrenheit or Celsius
- Fahrenheit
- Weight
- Weight mode: lbs or kg
- lbs
- Temperature Offset
- Sets the offset value. This feature is useful if you find that food is consistently either too brown or too light. When you select an offset value, the actual oven temperature is raised or lowered by this value.
- 0
- Sabbath Mode
- "Sabbath Mode" function: On or Off
- On
- The oven must be turned off with no timer running in order to access the "User Settings" menu.
- Baking results are better if pans are placed in the center of the oven. If baking more than one pan on a rack, allow at least 1"...
- Do not use aluminum foil or protective liners to line any part of the appliance, especially the oven bottom. Installing these liners may result in risk of electric shock or fire.
- . Place oven racks in desired position before heating the oven.
- . Preheat the oven when using the Bake, Convection Bake, Broil, Convection Broil and Pizza modes.
- . Allow oven to preheat while preparing recipe ingredients or food items.
- . Setting a higher temperature does not shorten preheat time.
- . Once oven is preheated, place food in the oven as quickly as possible to minimize the loss of heat and reduction of oven temperature.
- . Use Fast Preheat to speed up preheating.
- . Use the cooking recommendations as a guide.
- . Open the door as briefly as possible to avoid temperature reduction.
- . Use the interior oven light to view the food through the oven window rather than opening the door frequently.
- . Use the Timer to keep track of cooking times.
- . Glass baking dishes absorb heat. Follow manufacturers' recommendations.
- . For tender, light, golden brown crusts, use light, shiny metal bakeware.
- . Dark, rough or dull pans (nonstick or anodized) will absorb heat and result in a browner, crisper crust. Some manufacturers recommend reducing the temperature 25 ºF when using this type of pan. Follow manufacturers' recommendations.
- . Insulated cookie sheets or bakeware may increase the length of cooking time.
- . Do not set broil pans or any other heavy object on the open oven door.
- . Do not keep the empty broil pan in the oven during cooking as this changes cooking performance. Store the broil pan outside the oven.
- . When cooking at high altitudes, recipes and cooking times will vary. For accurate information, write the Extension Service, Co...
- . It is normal for certain amount of moisture to evaporate from the food during any cooking process. The amount depends on the m...
- Bake
- The Bake mode can be used to prepare a variety of food items, from pastries to casseroles. Refer to recipe or package directions for oven temperature and baking time.
- . Preheat the oven if the recipe recommends it.
- . Baking time will vary with the size, shape and finish of the bakeware. Dark metal pans or nonstick coatings will cook faster with darker results. Insulated bakeware will lengthen the cook time for most foods.
- . For best results, bake food on a single rack with at least 1-11/2" space between pans or dishes and oven walls.
- . Eliminate heat loss from the oven by using the window to periodically check food for doneness instead of opening the door.
- . If multiple racks are necessary, use a maximum of 2 racks. For cakes use rack positions 3 and 5. For cookies use rack position...
- Convection Bake
- Convection Bake is similar to Bake. Heat comes from the upper and lower heating elements. The main difference in convection baking is that the heat is circulated throughout the oven by the convection fan.
- The Convection Bake mode is well suited for baked goods such as cookies, biscuits, breads and cakes. It is also good for cooking on multiple racks (2 or 3) at the same time. The benefits of Convection Bake include:
- . Use of multiple racks at one time.
- . Slight decrease in cook time.
- . Higher volume (yeast items rise higher).
- . Even browning.
- . Reduce recipe temperature by 25 ºF. Refer to Convection Bake chart.
- . If baking more than one pan on a rack, allow at least 1" to 1 º" of air space around the pan. Stagger pans so that one is not directly above the other (see graphic below).
- Cupcakes
- Bundt Cake
- Angel Food
- Layers (8" or 9")
- Rectangle (9x13)
- 3
- 2
- 1
- 3
- 3
- 2+5
- 2+5
- 325
- 325
- 325
- 325
- 325
- 17-27
- 45-65
- 35-50
- 28-40
- 30-37
- 2 Crust, fresh, 9"
- 2 Crust, frozen, fruit, 9"
- Meringue Topping Pie
- Nut Pie
- Custard
- 2
- 2
- 2
- 2
- 2
- 350
- 350
- 350
- 325
- 425 325
- 45-60
- 75-85
- 12-18
- 45-60
- 12-15 30-48
- Sugar
- Chocolate Chip
- 3
- 3
- 2+5
- 2+5
- 1+3+5
- 1+3+5
- 350
- 325
- 6-10
- 6-17
- Lemon
- Brownie
- 3
- 3
- 325
- 325
- 30-40
- 30-45
- Yeast Bread, loaf, 9x5
- Dinner Rolls
- Quick Bread, loaf, 8x4
- Biscuits
- Muffins
- 2
- 3
- 2
- 2
- 3
- 2+5
- 2+5
- 2+5
- 400
- 375
- 350
- 325
- 400
- 23-33
- 10-17
- 48-62
- 12-19
- 14-21
- Fresh
- 3
- 2+5
- 1+3+5
- 400
- 23-33
- Roast uses both the upper and lower elements to maintain the oven temperature. Roasting uses more intense heat from the upper element than the lower element. This results in more browning of the exterior while the inside remains especially moist.
- Roast is best suited for large cuts of meat and poultry.


New Manuals
- ZyXEL Communications ZyXEL G-162 Video Gaming Accessories User Manual
- ZyXEL Communications EW103U/A Video Gaming Accessories User Manual
- Western Telematic RSM-8 Video Gaming Accessories User Manual
- Western Telematic RSM-32DC Video Gaming Accessories User Manual
- Western Telematic RSM-32 Video Gaming Accessories User Manual
- Western Telematic RSM-16DC Video Gaming Accessories User Manual
- Western Telematic RSM-16 Video Gaming Accessories User Manual
- Viking Electronics FBI-1A Video Gaming Accessories User Manual
- Viking Electronics DVA-500A Video Gaming Accessories User Manual
- Viking Electronics DVA-3003 Video Gaming Accessories User Manual
- Viking Electronics DVA-2W Video Gaming Accessories User Manual
- Viking Electronics DVA- 1003B Video Gaming Accessories User Manual