
BR-8PC Guide
User manual for BR-8PC
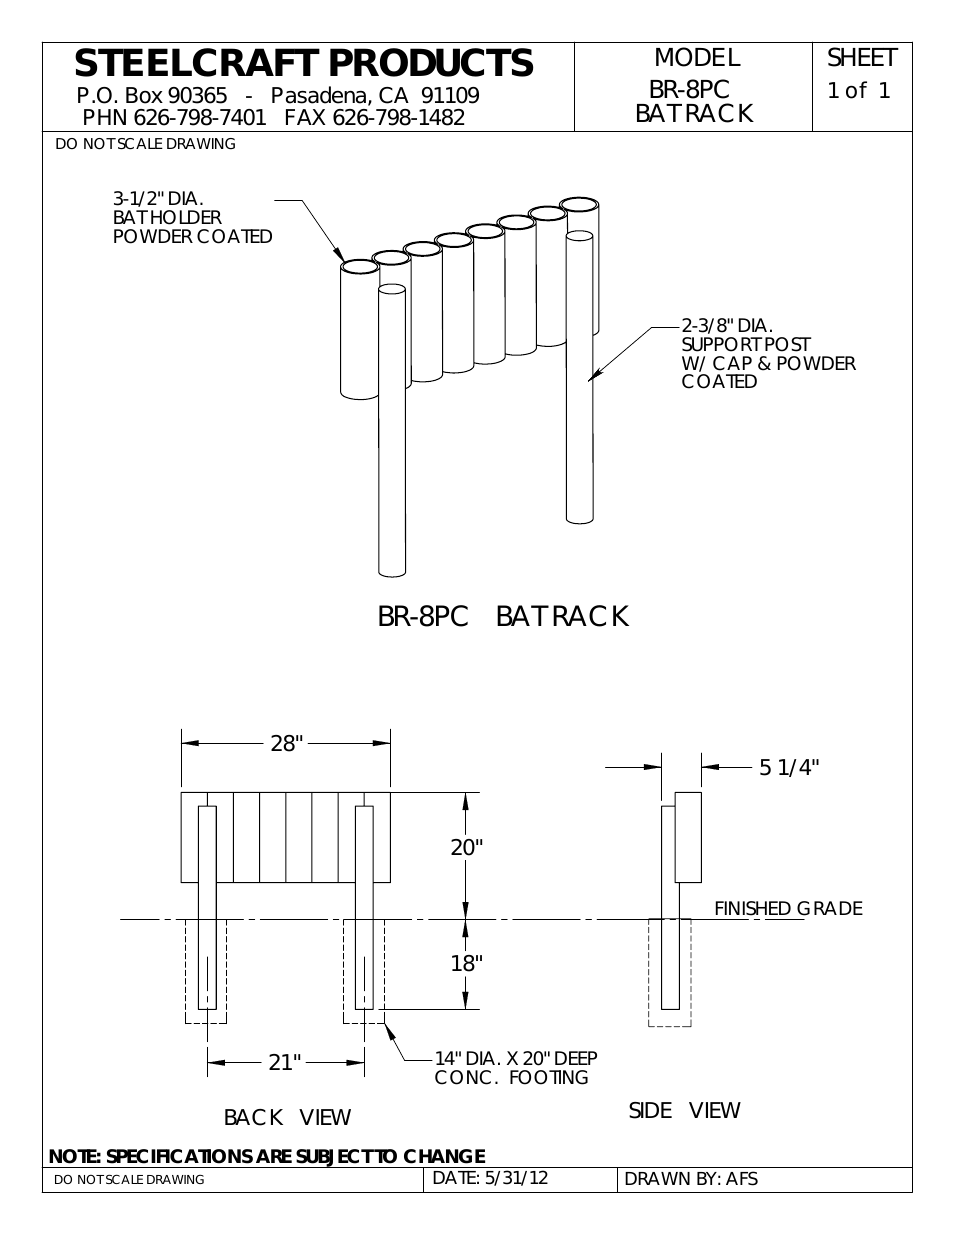
Table of contents
Document Outline
- TABLE OF CONTENTS
- INTRODUCTION
- SAFETY & WARNINGS
- This user guide contains important information about safety precautions and the set-up and use of the projector. Please read the manual carefully before you operate the projector.
- SAFETY
- WARNING
- Use only the cables and cords supplied with the projector or original replacement cables. Using other cables or cords may lead to malfunction and permanent damage of the unit.
- Always use 3-prong power cord to ensure proper grounding of the unit. Never use 2-prong power cords, as this is dangerous and could lead to electrical shock.
- Never open the unit. The projector contains no user serviceable parts. Refer all repairs to qualified personnel only.
- Make sure that no objects enter into the vents and openings of the set. Do not spill any liquids on the projector or into the vents or openings of the unit.
- Always remove lens cap before switching on the projector. If the lens cap is not removed, it may melt due to the high energy light emitted through the lens. Melting the lens cap may permanently damage the surface of the projection lens.
- Do not look into the projection lens when the projector is switched on. The strong light may permanently damage sight.
- Do not look into the laser beam when activated on the remote control. Laser light may permanently damage sight. Do not point laser beam on people.
- Only place the projector on a stable surface, or mount it securely using an approved ceiling-mount.
- Do not drop the projector.
- Always operate the projector horizontally, within the range of the adjustable rear feet. Operating the unit in other positions may reduce lamp life significantly, and may lead to overheating, resulting in malfunctioning.
- Always allow ample airflow through the projector. Never block any of the air vents. Never cover the unit in any way while runnin...
- CAUTION! Hot air is exhausted from the side vent. Do not place objects that are sensitive to heat nearer than 50 cm/20" to the exhaust vent.
- The projector is designed for indoor use only. Never operate the unit outdoors.
- Do not operate the projector outside its temperature and humidity specifications, as this may result in overheating and malfunctioning.
- Only connect the projector to signal sources and voltages as described in the technical specification. Connecting to unspecified signal sources or voltages may lead to malfunction and permanent damage of the unit.
- Allow the unit to cool down for 60 minutes before lamp change.
- INFORMATION AND WARNING ABOUT POTENTIAL HEALTH ISSUES RELATED TO MERCURY VAPOR
- This projector is using an extremely bright UHP™ lamp for illumination to attain the desired high brightness image.
- This technology is similar to other high-pressure discharge lamps that are extensively used in cars, street lights and other lig...
- It is very important that lamps containing mercury are treated properly to minimize potential health hazards.
- The UHP™ lamp, like any other high brightness projector lamp, is under high-pressure when operating. While the lamp and the proj...
- As a general precaution, secure good ventilation in the room when operating the projector. If lamp rupture occurs, evacuate the room and secure good ventilation. Children and pregnant women in particular should leave the room.
- When replacing a worn lamp, dispose of the used lamp carefully by proper recycling.
- Mercury is a naturally occurring, stable metallic element that may pose a safety risk to people under certain conditions. Accord...
- Seek medical attention if any of the above symptoms are experienced or if other unusual conditions are experienced following lamp rupture.
- REMOTE CONTROL WARNING
- LASER RADIATION WARNING
- OVERVIEW
- KEYPAD
- STATUS
- REMOTE CONTROL
- CONNECTOR PANEL
- A YPbPr: Used for high quality video reproduction.
- B S-VIDEO: Used for improved quality video.
- C C-VIDEO: Used for standard video quality.
- D DVI-D - Digital RGB: For a low noise computer and video image.
- E Monitor VGA out: Allows for connection to local VGA monitor or daisy-chaining of several projectors using VGA. Works with VGA inputs only.
- F VGA - Analog RGB 1-2: The standard analog computer graphics interface.
- G RS 232 control in-out: Allows for wired remote control and monitoring of many projector functions used in installation environ...
- H Audio in 1-2: Allows for connection of up to two audio sources simultaneously.
- I Audio out: Connection to external audio system.
- J RC: Allows connection of external IR receiver or wired remote control.
- K USB - interface: Allows for computer mouse control.
- L LAN: Provides access to control and monitoring over a Local Area Network.
- M Mains power connector: Use only three-prong, grounded power cord.
- SET UP VIDEO
- Before setting-up, switch off all equipment.
- Three video sources may be connected, using the YPbPr (component), S-VIDEO (super video) and VIDEO (composite video) inputs.
- Component video will display more detailed images. Composite video yields images with less detail.
- In addition, the DVI-D input can be used with video sources (DVD player fitted with an HDCPTM compliant DVI or HDMI connector) for a pure digital connection.
- Connect the power cord.
- SETUP COMPUTER
- Before setting-up, switch off all equipment.
- The projector may be connected to up to three computer sources simultaneously, using the VGA and DVI inputs.
- The VGA interface is analog and may cause some noise in the projected image, depending on the signal quality from the VGA graphics card in the computer.
- The DVI (Digital Visual Interface) interface is all-digital and will yield a projected image with very low noise.
- Connect the USB cable to allow for remote mouse control.
- Connect the power cord.
- Connect the RS232 interface to allow for individual or global control of multiple units in a daisy chain configuration.
- Connect the LAN connector for individual control and monitoring of multiple projectors over LAN.
- IMAGE ADJUSTMENTS
- CEILING MOUNT (option)
- USING THE PROJECTOR
- After setting-up, switch on all equipment.
- To switch the projector on, firmly press the POWER button on the keypad or the remote control. The STATUS indicator will turn from yellow to green when the unit is switched on.
- If the STATUS indicator is flashing yellow, please wait until it turns permanent yellow.
- When only one source is connected, the projector will auto- detect that source. If more sources are connected, the projector wil...
- Select between the sources by pressing the SOURCE buttons on the keypad or the remote control. Only sources that are active will be displayed.
- If no source is active, searching messages will appear on the screen.
- If no source is active for a long time, the projector will go in standby mode if DPMS (power save) is set to ON in the SET UP su...
- To switch the projector off, firmly press the POWER button on the keypad or the remote control twice (to confirm that you really want to switch off the unit). The STATUS indicator will turn from green to flashing yellow, then yellow when switched off.
- You may not switch the unit on while the STATUS indicator is flashing yellow. Please wait until the indicator is permanent yellow.
- MENU SYSTEM
- The menu system gives access to a multitude of image and system controls. The menu system is structured through a top menu and s...
- When accessing the menu system, you will enter at the position you left last time you were using the menu system.
- Press the MENU key and navigate using the arrow keys on the keypad or the trackball or the arrow keys on the remote control
- TOP MENU
- PICTURE SUB MENU
- DYNAMIC SUB MENU
- ADVANCED SUB MENU
- SET UP SUB MENU
- FOR ALL
- keystone V
- Adjust vertical keystone correction. Compensates for the geometrical distortion of the projected image resulting from tilting the projector to shoot higher up on the wall.
- keystone H
- Adjust horizontal keystone correction. Compensates for the geometrical distortion of the projected image resulting from shooting the image at an angle sideways on the screen.
- DPMS
- Activate/deactivate DPMS (Display Power Management Signalling). When DPMS is on, the projector will switch off following the powering off or disconnection of the signal source.
- The projector will switch back on when the signal source is reactivated.
- source scan
- Switches source scan on and off. With source scan on, the projector will search for another source if the current source is disc...
- orientation
- OSD
- language
- RGB video
- FOR ALL
- UTILITIES SUB MENU
- CONTROL SUB MENU
- MOUSE CONTROL
- You may control the computer mouse functions using the remote control.
- In order to enable this function, connect a USB cable between the computer and the projector. Ensure that the PC has an operating system that supports USB (Windows™ 98 2nd edition or newer).
- As long as the menu system on the projector is not activated, the tracker ball on the remote control will now emulate the mouse movements. When the menu system is activated, the tracker ball is used for menu navigation. (See menu system chapter).
- Point the remote control directly at the IR receiver in the front or in the rear. Move the mouse pointer by rolling the tracker ball in the direction required. The LEFT key emulates the left mouse key, while the RIGHT key emulates the right mouse key.
- The pointer movement may not be as smooth as you are used to with you ordinary mouse, due to the reduced bandwidth of the infrared remote control connection.
- RS 232 AND LAN CONTROL
- RS 232
- You may control and monitor the projector remotely through the serial RS232 control interface.
- The RS232 protocol is a binary protocol where each command is a series of 32 bytes in one packet. The protocol allows for both S...
- A separate document “RS-232 and LAN communication protocol and command set” is available that describes the communications parameters and operational codes in detail.
- LAN
- The projector can be controlled and monitored using through the LAN connector as an alternative to RS232.
- LAN control is based on the same command set as RS232.
- NOTE! THE PROJECTOR IS CONFIGURED WITH A DEFAULT IP ADDRESS. SEE THE SYSTEM INFORMATION AVAILABLE THROUGH THE MENU SYSTEM OR REMOTE CONTROL FOR THE ACTUAL IP-ADDRESS.
- Detailed descriptions of configuration, use and command set is described in a separate document “RS-232 and LAN communication protocol and command set”.
- You may consider using the LAN interface as a means of theft- detection. When the projector is removed, the LAN will be disconnected; this may be detected over the local area network and could be used to trigger an alarm.
- RS 232
- TROUBLESHOOTING
- MAINTENANCE
- The projector may from time to time need cleaning. Never open the unit, as this will void any warranties. Refer service and repair to qualified personnel only.
- The projector is using a lamp that has a limited life time. Please refer to the LAMP CHANGE section below for further details.
- Only the exterior of the unit may be cleaned. Use a damp cloth. Make sure no liquids enter the inside of the projector
- Vacuum clean all the air vents (A) regularly to maintain sufficient air flow.
- The projection lens (B) is sensitive to scratches. Use lens cleaning tissue, available at all photographic stores when cleaning the projection lens. Use lens cap when not in use.
- HEAVY DUTY AND CONTINOUS USE
- LAMP CHANGE
- The STATUS lamp on the keypad will turn red when the lamp life expires. In addition, a message will appear on the screen: “LAMP LIFE TIME HAS EXPIRED! Please change lamp!”
- Change the lamp when lifetime expires. Always replace lamp with the same type and rating.
- Always disconnect the power cord and wait until the projector has cooled down (60 minutes) before opening the lamp cover (B).
- SERVICE INFORMATION
- This product contains no user serviceable parts.
- If the product fails to function as expected, please first check that all connections are properly made, and that the power cord is properly connected.
- Please check that the projector as well as the video and computer sources are all switched on.
- Cables and cords may break over time. Try to change cables and cords, in case there is a bad or intermittent connection.
- Check if the circuit breaker or fuse of your mains is intact.
- In the event of product failure, please contact your reseller. You should prepare a description of the symptoms of failure you experience.
- Please also state product number and serial number as printed on the label on the bottom of the projector.
- TECHNICAL DATA
- DECLARATIONS
Related manuals for BR-8PC

New Manuals
- ZyXEL Communications ZyXEL G-162 Video Gaming Accessories User Manual
- ZyXEL Communications EW103U/A Video Gaming Accessories User Manual
- Western Telematic RSM-8 Video Gaming Accessories User Manual
- Western Telematic RSM-32DC Video Gaming Accessories User Manual
- Western Telematic RSM-32 Video Gaming Accessories User Manual
- Western Telematic RSM-16DC Video Gaming Accessories User Manual
- Western Telematic RSM-16 Video Gaming Accessories User Manual
- Viking Electronics FBI-1A Video Gaming Accessories User Manual
- Viking Electronics DVA-500A Video Gaming Accessories User Manual
- Viking Electronics DVA-3003 Video Gaming Accessories User Manual
- Viking Electronics DVA-2W Video Gaming Accessories User Manual
- Viking Electronics DVA- 1003B Video Gaming Accessories User Manual